Sunday, January 10, 2010

Cream of Cucumber Soup

I needed a nice chilled soup to serve alongside a meal, and since we had several cucumbers, I began googling and comparing soups until this one truly interested me.

Just the idea of blending romaine with cucumbers then adding avocado! How much fresher and refreshing could a chilled soup become? Besides, the theme of the rather Italian meal was avocado, so this fit in perfectly.

This was served alongside Herbal Cheese Rolls before the main dish was brought in, and the gently cool texture really stimulated the appetite in such a soothing way.
I found it really made conversation more comfortable, definitely something to keep a note on for posterity!


CREAM OF CUCUMBER SOUP

4 romaine lettuce leaves, chopped (about 1.5 cups) (I use tightly packed cups)
1 cucumber, peeled, seeded, and chopped (about 1 cup)
1/2 cup water
1 T lemon juice
1/2 t crushed garlic (1 clove)
1/4 t salt
1/2 ripe avocado, chopped
1 T extra virgin olive oil
1 T minced fresh herbs, or 1 t dried (I use parsley)

Place the lettuce, cucumber, water, lemon juice, garlic, and salt in a blender and process until smooth. Add the avocado and EVOO and blend again until smooth. Add the herbs and blend briefly to mix. Serve immediately. For a chilled soup, refrigerate for 2 hours before servings.

My note: I doubled the recipe of course, and also added a little more lemon juice.
My mother tossed in some fresh basil and it really worked! Since the food culture of the evening was Italian, the basil only embellished the theme.

Garnishing idea: We sprinkled the top with chopped chives and a miniscule drip of whipping cream.

Nifty Banana Souffles in their Skins


Upon seeing these in a recipe book, at once I chose the next available breakfast to make them. I find myself making desserts many times for breakfast, but as no complaints are lodged, perhaps it isn't a bad idea! Another dessert I have made before for brekafats which comes to mind - I've made it thrice, to be honest - was the Grand Marnier Crepe Cake, a favourite of my lovely sister Catherine.

Anyway, I love souffles, and having never made banana souffle, I looked them up in my recipe book, and these came up. It remided me of when I made curry potatoes, where you halve the potatoes, scoop out the flesh, stir-fry the flesh with spices and then return it to the skin before baking them all and serving with sour cream.
I did result in a large quantity of left-over souffle mixture after this, so I made a big souffle for the next day's breakfast, since I had already served pre-made Apple Spice Bread alongside these little souffles for breakfast.

Note: The recipe only serves two people, as it is a dessert. I doubled the recipe, giving everyone one each (some fortunates recieved two), and the rest of their hunger was satisfied with another recipe of Apple Bread. So unless you are not serving these after dinner, I'd recommend pairing them with something more substantial!

NIFTY BANANA SOUFFLES IN THEIR SKINS

Overall timing: 25 minutes
Serves: 2

Ingredients

4 Ripe Bananas
2 T Butter
6 T Sugar
Vanilla
2 T Rum
2 Large Eggs
2 T Confectioners' Sugar

METHOD

Preheat the oven to 425 degrees.
Make two lengthwise slits with a sharp knife at the top of each banana, leaving the skin joined at the stalk end. Roll back skin. Remove banana pulp with a teaspoon and place in a bowl. Mash well to a puree.
Put the banana puree into a saucepan with the butter, sugar, a few drops of vanilla and the rum. Cook for about 3 minutes over a low heat, stirring constantly. Remove from heat.
Separate eggs. Stir yolks into the banana mixture. Place pan in cold water to cool mixture quickly. Beat egg whites till firm, then lightly fold into cold banana mixture with a metal spoon.
Fill banana skins with mixture. Place on a baking sheet and bake for about 10 minutes. Sprinkle with confectioners' sugar and serve immediately with pouring cream.

Saturday, January 9, 2010

Chicken and Prawn Money Bags


If ever you are throwing a hors d'oevres party and want a more cultural nibbley-dibbley, or you are having Chinese food and would like an entree, I have relied on the almighty Money Bags to solve the issue for a while! More ommonly known as 'wontons', one of the best things about them is the fact you can do almost anything to the filling and it hardly matters! Of course, having a good, tasty filling is optimal, but the diversity in wonton fillings is incredible! (of course, I wouldn't recommend going with vegemite and sweet chilli sauce with cream cheese, but hey, if *you* like it.....!)


Recently I've developed an interest in dumplings, but they are, I grant you, slightly more difficult to make; they must be kept steamed until just before serving and you can't really lump them together, amid other complications... Wontons though, you can even make a dumpling recipe and then toss then in the oil and make wonton-like yummies. Wontons can thence be kept in the oven on a slightly warm temperature till serving time. Very handy.
Putting together a good filling for the wontons isn't difficult, but I would recommend making it a day in advance, or at least a few hours. This is because it's meant to marinate and as we all know, the longer in marinates, all the difference in world! It usually composes of chicken and prawns, but I occasionally use pork, like in dumplings; personally I like the filling to have that denser, chewier consistency pork gives after biting through the golden crackling shell of the fried wrapper.

You can even make the wontons and setting them on a tray dusted with cornstarch, cover it all with cling wrap and freeze it until needed. Very handy if you're catering, which I did once when taking a 5 hour drive to Massachusetts for New Years a few years back. Fry them and pair it with say, a nice plum sauce, and there you are!


For those of us who like things a little fancier, after frying and cooling the wonton, you can then slice a strip of spring/green onion and tie it around the neck of the 'money bag'. It really adds to the effect, and livens up the colour of the dish, especially when paired with the plum sauce, you then have the gold of the wonton, the dark red of the sauce and the bright green of the onion.

Aye, very bourgeois.

And for those of us who really like to have as much in the recipes made at home as possible, you can even make the wrappers.
Don't be daunted. In the beginning, it may be slightly tricky, but the ingredients are almost nothing, and then it's just a matter of rolling it out in squares when you're ready.


If it's for a big party, I would recommend making up the wrappers' dough and assembling the wontons the day before, refrigerating/freezing them until serving time. (allow for a short while for them to thaw, bien sur!)


CHICKEN AND PRAWN MONEY BAGS

Ingredients

250 g raw prawns, peeled and deveined
1 dried black shiitake mushroom, soaked in hot water to soften, finely shredded*
1 spring onion/shallot, chopped
1 teaspoon very finely grated ginger**
1 teaspoon Chinese rice wine [S]
1/2 teaspoon very finely chopped garlic
1/2 teaspoon salt
1/4 teaspoon sugar***
1/4 white pepper
200g minced chicken
3 water chestnuts, very finely chopped [S]

40 wonton wrappers

2-3 cups (500-750 ml) vegetable oil for deep-frying
spring onion curls or strips, to garnish


[S]ubstitutes

- Use sherry or mirin instead of Chinese rice wine
- Use 2 tablespoons finely chopped celery if you do not have water chestnuts

* shiitake mushroom - I never have these type mushrooms around (to my grief), but I'm sure it'd make it much nicer than your average mushrooms (avoid the canned ones, of course!)
** ginger - I always add a little extra ginger to my asian recipes, remember that you can just flow with these Money Bags fillings, a little more of this, a little less of that...
*** sugar - I never add this, but you can if you'd like that extra bing


METHOD

Mince the prawns and put them in a medium sized bowl. Add the mushrooms, spring onion, ginger, garlic, salt, sugar and pepper and mix well.

Place the prawn mixture in a medium bowl. Add the chicken and water chestnuts, mixing well.

Leave for at least an hour and up to two days for the mixture to really have a good soak.

Prepare the wrappers (Recipe Below).

Now for the fun!

Place one heaping teaspoon of the mixture in the centre of each wonton wrapper.*

Gather in the sides and press firmly to make a bag with a "neck", leaving a frill of wonton wrapper at the top.

Heat a wok or deep frying pan for 30 seconds, then add the oil. When hot, add the filled wrappers, a few at a times, and cook until golden brown and crisp, about 3 minutes.

Drain on paper towel, transfer to a serving dish and garnish with spring onion. Serve hot.

* Ensure you don't overfill the wrapper or it won't close.


WRAPPERS RECIPE

1 egg

3/4 teaspoon salt
2 cups flour
1/3 cup water

1. In a medium bowl, beat egg. Mix in water.
2. In a large bowl, combine flour and salt. Make a well in the centre of the mixture and slowly pour in your egg and water mixture. Mix well. If mixture is too dry, increase the amount of water one teaspoon at a time until a pliable dough has formed. (you will probably use little less than 1/2 cup water)
3. On a lightly floured surface, knead dough until elastic. Cut dough into two separate balls. Cover dough and let sit for a minimum of 10 minutes.
4. Rip ball from dough and roll out into 3 1/2 inch x 3 1/2 squares.

Friday, January 8, 2010

Lemon Rosemary Chicken


Before anything is said I must share with you that this marinade is divine. It's so insanely delicious that you have to only have a bit of it, because of the strong flavour, of which most of the credit is rendered to the lemon juice!

What I find to be so incredibly brilliant about this recipe is that you do not throw out the marinade after using it. You take ti and blend it with cream and then serve it over your grilled meat.

Even though this recipe is intended for skewering and grilling, I simply marinated the chicken and cooked in my skillet, for it can be then serving it with rice and fresh vegetables. The greatest part is the idea behind doubly using the marinade, since I've always disliked throwing out the marinade even if you brush the meat under the broiler or over the growl, it seems such a waste.

This would be absolutely lovely on a summer afternoon, because of the freshness felt from the tang of the lemon in the aroma of the rosemary.

Here is the recipe though, according to the skewering format. I can attest it would be far superior than how I did it since the cherry tomatoes would lend an even fresher touch to it...and who doesn't enjoy grilling?

Personally, I love it. Just have the marinated meat going, enjoy some Storm King Stout, chat with your friends... it's really a social event!


LEMON-ROSEMARY CHICKEN SKEWERS

Ingredients

8 skinless boneless chicken breast halves (each about 7 ounces)
48 8-inch bamboo skewers, soaked in water 30 minutes, drained
1 1-pint basket grape tomatoes or small cherry tomatoes

1 cup olive oil
1 cup fresh lemon juice
6 bay leaves, broken into small pieces
3 tablespoons chopped fresh rosemary
4 large garlic cloves, pressed
2 teaspoons salt
2 teaspoons hot pepper sauce

1 cup light mayonnaise

Method

Cut each chicken breast half lengthwise into 6 thin strips. Thread each strip completely onto 1 skewer, leaving 1/2 inch of skewer exposed at 1 end. Press 1 grape tomato onto end of skewer. Divide skewers between two 15x10x2-inch glass baking dishes, stacking skewers if necessary.

Pour oil into bowl. Whisk in next 6 ingredients. Pour marinade over chicken. Marinate 1 hour at room temperature, turning often, or cover and chill overnight.

Preheat oven to 425°F. Remove skewers from marinade and arrange on 2 large rimmed baking sheets; reserve marinade. Bake chicken until just cooked through, about 8 minutes. Transfer to platter.

Transfer reserved marinade to medium saucepan. Boil over medium-high heat 1 minute. Cool marinade 15 minutes. Strain. Pour 1/2 cup marinade into medium bowl; whisk in mayonnaise. Season sauce to taste with salt and pepper. Spoon remaining marinade over chicken to moisten. Serve chicken with sauce.

Friday, August 21, 2009

Souffle Milanaise (Cold Lemon Souffle) with Raspberry-Rum Sauce


If you have made souffles before, you know how they are hardly not difficult. Basically a whipped cream mixture and meringue mixture folded together. Bake it or refrigerate it, depending on what type.
Souffle Milanaise is a beautiful way to end any meal. Perfect for summer, using fresh lemon, spooning through the lighter-than-mousse souffle is such a lovely experience. Have an almond brittle spotted through the souffle for texture, a little of the crimson sauce and good conversation, and you'll wonder why you didn't have dessert first.


I have made this recipe four times to date, and what I love about it the most (no, not the rum in the sauce for all the smart ones out there) is the concept of folding in the almond brittle.

Just after you have folded together the souffle, before you put it in the fridge to set, you make up a simple almond brittle (sugar, water, almonds) and cool it, smash it, and fold the little pieces into the souffle. Let it set, and when you eat it, instead of simply spooning through the souffle pudding (which is undoubtedly great) you have the little bits of almond which not only add a little sweetener, but they bring a texture to the dessert so it is more of a deliciously filling experience, as many people don't like the souffle slipping down their throats. If you are used to thick desserts (cake, pie, trifle), and haven't quite caught on with the extreme lightness of the Souffle, this idea is simply smashing.


****************************************************

SOUFFLE MILANAISE

Ingredients:

5 Eggs separated
1 1/4 cup Sugar
2 cups Whipping cream
3 large Lemons
2 Envelopes unflavored gelatin
1/8 teaspoon Cream of tartar
Fresh raspberries (optional)


Directions:
Beat together egg yolks and sugar. Grate rinds of lemons (this is optional, but preferable) and squeeze out juice, measuring out 2/3 cups lemon juice. Add rind to the egg yolks, then gradually add the 2/3 cups lemon juice, beating all the while. (This "cooks" the egg yolk.)
Soften the gelatin in 1/2 cup of hot water and beat until it is dissolved. Allow to cool slightly. Whip the cream lightly and stir into lemon mixture; then stir in gelatin and continue stirring until mixture begins to thicken. Beat egg whites with cream of tartar until stiff but not dry; fold into lemon mixture.

Make Almond Brittle* (recipe below) and fold into souffle.
Spoon souffle into dish and chill in refrigerator until completely set (about two hours, can do overnight).

Before serving, garnish souffle with raspberries if desired.

Make Raspberry Rum Sauce* (recipe below) and place 1-2 tablespoons over each serving.


* Both Almond Brittle and Raspberry RUm Sauce may be prepared long before hand and stored in the fridge or larder. Ensure to rewarm the raspberry sauce because it sets gently when left alone.

ALMOND BRITTLE
This recipe is simple, but it is easy to burn. Vigilance is key.

2 cups blanched almonds (or pecans)
1 cup sugar
1/4 cup butter
1 tsp vanilla

Combine almonds, sugar and butter in skillet.
Cook over medium heat, stirring until almonds and sugar are golden brown.
Stir in vanilla.
Spread almonds onto foil.
Cool.
Break into chunks, enclose in ziploc bag and with rolling pin, smash until reasonably fine.*

*Do not break them too much, otherwise the resulting powder has no texture or place in the souffle. Do not leave pieces too large as to be an issue when eating the souffle. It should be easy to discern.


RASPBERRY RUM SAUCE

Seedless Raspberry Preserves *
Rum **

Heat the desired amount of preserves in a bowl in the microwave for 3 minutes, or until almost runny. Stir.
Pour desired amount of rum into preserves, stirring and sampling until flavoured to personal taste.

* You can use regular raspberry preserves and strain out the seeds with a metal strainer when it is warmed and runny. Try to strain as completely as possible.
** Brandy or whisky may be substituted if suffering from a deficit of rum.


Make sure you consume this on the day, or the day after. Store in the refrigerator of course, but it doesn't keep well for long.

Thursday, August 20, 2009

Stained Glass Cake


I honestly do not think I will ever come across a more colourful dessert.


Upon seeing this bizarrely colourful cake, I really wanted to make it for the next family event.
Other than being softly sweet and brightly colourful, its gentle texture and lightness made it perfect for the finale of a large summer meal.
I paired it with a Souffle Milanaise (cold lemon souffle) for supper when we had our dear friends the Shanahans come over, and then when the McWhirters came over, and it was then paired with a large English Trifle. On both occasions we had a real blast; and not just because we had the Stained Glass Cake for dessert.


This Stained Glass Cake could almost be counted as one of my Redwall recipes, because not only do I not know where quite to categorise it, but because of the stained-glass idea, it is like a monastery window, which is Redwall.
This is a huge crowd pleaser, because it makes the adults feel refreshed by the lightness, and the little ones become eager due to the colours. Blue jello for me it what really makes this recipe. You can make it for Christmas, using only red and green jello, who knows?
In one sentence, this neat recipe is gelatin mixed into whipped cream, with 3 different choices of jello cubes folded into it, on a graham cracker crust. Tada.


**************************************

Stained Glass Cake
From Cook's Country, June/July 2009

12 graham crackers, crushed to fine crumbs (about 1 ½ cups)
¾ cup sugar, divided
5 tablespoons butter, melted and cooled
3 (3 ounce) boxes Jell-O
4 ½ cups boiling water
¾ cup pineapple juice
1 envelope unflavored gelatin
2 cups heavy cream
1 teaspoon vanilla extract
1/8 teaspoon salt

For the crust: Adjust oven rack to middle position and heat oven to 325 degrees. Stir cracker crumbs, ¼ sugar, and butter in bowl until crumbs resemble wet sand. Press into bottom of 9-inch springform pan and bake until edges are golden brown, 12 to 15 minutes. Cool on wire rack.

For the filling: In 3 separate large bowls, whisk each box Jell-O with 1 ½ cups boiling water until dissolved. Pour into 3 loaf pans or pie plates (I used cake pans) and refrigerate until set, about 4 hours. Once set, cut into ½-inch cubes and keep chilled. Combine ¼ cup pineapple juice and unflavored gelatin in bowl. Microwave, stirring occasionally, until dissolved, 1 to 3 minutes.
Slowly whisk in remaining pineapple juice. With electric stand mixer set on medium-high, whip cream, vanilla, salt, and remaining sugar until stiff peaks form, about 3 minutes. Reduce speed to low and slowly add juice mixture until combined.
Gently fold Jell-O cubes into cream mixture. Scrape into prepared pan and refrigerate until set, at least 4 hours or up to 2 days.

This cake should be eaten the day of or after. Though stored in the refrigerator, it doesn't keep well after 2 days of sitting.

Wednesday, August 19, 2009

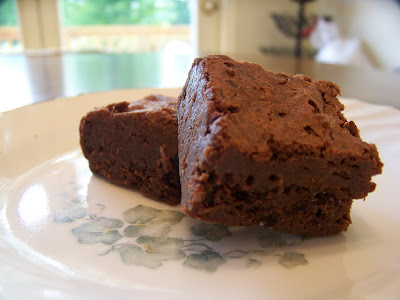
Supreme Chocolate Brownies

I seriously had to put this one up as soon as I could.
Because I want it to get out there and have everyone making it!

I was searching for the best chocolate brownie recipe, when I happened upon this one and its description alone won me over. I paired this recipe with a Pumpkin Mousse Pie after tea for my friends one Sunday; and I dare anyone to show me a better recipe.
This is the smoothest, fudgiest, most succulent fudge brownie ever invented, with nothing added but a full-powered chocolate flavour.
You can add nuts if you want, but it would be like adding nuts to a chocolate mousse!


Seriously, one thing which is unbelievable about this recipe is that you can either have it normal, and it will have the soft fudgy cake texture; but heat it up on a saucer in the microwave for less than 10 seconds, and it will instantly become a block of chocolate mousse. Your spoon will glide through it and you would have never thought it was a brownie.

Beat that.

The method is so simple; I suppose the trick would be in not baking the batter completely, and then refrigerating it after cooling a bit.
This would be delicious paired with another dessert, or had on its own with a glass of milk, as the remnant brownies were treated the next day.

Enjoy!


SUPREME CHOCOLATE BROWNIES

1/2 cup plus 2 tablespoons
(1 stick plus 2 tablespoons) unsalted butter
5 oz bittersweet (not unsweetened) or semi-sweet chocolate, broken up or coarsely chopped
2/3 cup all-purpose white flour
1 1/2 tablespoons unsweetened American-style cocoa powder, sifted after measuring
1/4 tsp salt
1 cup sugar
1/3 cup packed light brown sugar
3 large eggs
2 1/2 teaspoons vanilla extract

Preheat oven to 350 degrees F. Lightly grease an 8 inch square baking pan, or coat with nonstick spray. Line the pan with aluminum foil, letting the foil overhang two opposing sides of the pan by about 2 inches. Grease or spray foil with cooking spray.

In a large, microwave-safe bowl, microwave the butter and chocolate on 100-percent power for one minute. Stir well. Continue microwaving on 50-percent power, stirring at 30 second intervals. Stop microwaving before the chocolate completely melts, and let the residual heat finish the job. (Alternatively, in a large, heavy saucepan, melt the chocolate and butter over lowest heat, stirring frequently being very careful not to burn. Immediately remove from heat.) Let cool to warm.
In a small bowl, thoroughly stir together the flour, cocoa powder, and salt and set aside. Stir the sugar and brown sugar into the chocolate-butter mixture until well combined. Add the eggs and vanilla, and stir until sugar dissolves and the mixture is well blended and smooth. Stir in the flour mixture just until evenly incorporated. Turn out the batter into the baking pan, spreading to the edges.

Bake in the middle of the oven for 28-33 minutes, or until the center is almost firm when tapped and a toothpick inserted in the center comes out clean except for the bottom 1/4 inch which should still look moist. Transfer the pan to a wire rack and let stand until brownie is completely cooled. Refrigerate until well chilled.

Using the overhanging foil as handles, transfer the brownie to a cutting board. Carefully peel off and discard foil. If desired, cut away and discard any overbaked edges. Using a large, sharp knife, cut the brownie into 12 bars, wiping knife clean between cuts.


Store in an airtight container for up to a week, or freeze for up to a month. If freezing, leave brownie slab whole and cut into bars when partially thawed.